The inventory editor, another look
Before we continue, it's important to mention global messages.
As you saw earlier in the tutorial, each room has its own set of messages,
which can be edited by the message editor. However, sometimes we want to
display some text no matter what room the player is in - and we don't want
to have to add the same message to every room.
Go to the "Global messages" mode from the main tree, and you'll see a long list of numbers, with "no message" beside them all. These are your global message slots, and they are numbered from 500 upwards. This numbering is so that there is no conflict between global and local (room) messages. If you use a "Display Message 503" command, for example, there is no doubt that it refers to a global message.
If you scroll to the bottom, you'll notice that slots 983-999 already have messages defined. These are the texts used for various built-in dialogs, such as Save, Restore and Quit dialogs, and therefore this allows you some customization.
Now, in the next section we're going to need a message for when the player looks at the key. So, scroll up to the top and double-click message 500. Write whatever you like - I'm going to say "You found this yellow key cunningly placed in the middle of the walkway."
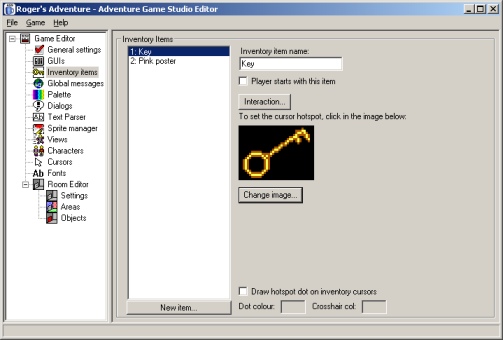
Each character in the game can carry their own set of inventory items. Inventory items are totally seperate from room objects, and you must explicitly set up every item which the player can carry at some point in the game.
Go to the "Inventory items" mode. We visited this briefly in part 4, but it's time to go into a bit more detail.
The inventory editor, another look
Every inventory item which the player can carry at some point during the game is listed in the list box. All the items there also have a number beside them - this is the inventory item number which you use in calls to Add Inventory, Lose Inventory and so forth.
If you want the player character to start off carrying the selected item, check the "Player starts with this item" checkbox. To set what image is used, click the "Change image" button.
Now, you may have noticed that once the player had picked up the key in our game, they could see it in their inventory window but not actually do anything to it - clicking Look or Use on the item did nothing.
In order to set a reaction for the player looking at their inventory items and so forth, we once again need to call on the Interaction Editor. Click the "Interaction" button to bring it up:
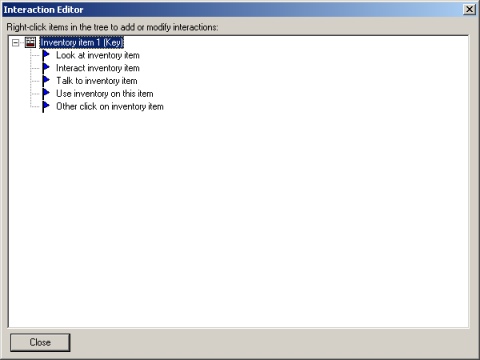
The interaction editor... this time with inventory
Now, the important point to note here is that if you are using the built-in inventory window (which we are), the only events which can occur are "Look at inventory item" and "Use inventory on this item". This is because the default inventory window only has Look and a Select options. The other modes are all available if you design your own inventory GUI (but that's quite complex so we'll leave it for later).
So, double-click the "Look at inventory item" event. Add a
"Game - Display a message" command and change the message number
to 500, to use the message we just defined.
|
|
When handling inventory items, only use global messages since they will be constant throughout the game. If you use a room message, and the player then looks at the inventory item when they're in a different room, you will get an error. |
OK out of the interaction editor, and you should be returned to the inventory screen.
By default, when the player selects an inventory item as their mouse cursor and clicks on the screen with it, the centre of the item will be used to decide what to activate. However, with some items you may well not want this behaviour - for example, we might want the end of our key to be the activation spot.
To set this, simply click on the spot within the image. You should see the yellow dot move to go where you clicked.
The "Draw hotspot dot on inventory cursors" option, if activated, will draw a spot on this part of the item in-game. You can set the inner and outer colours for the spot.
Go to part 6: Using your own graphics
Tutorial last updated 29 November 2002. Copyright (c) 2001-2002 Chris Jones.