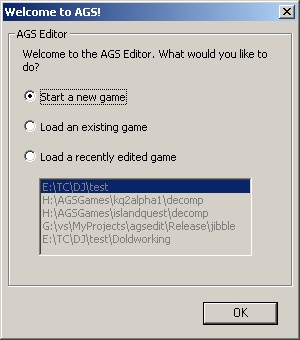
The "Welcome to AGS" dialog
So, you've downloaded AGS. You want to make an adventure game. But where do you start?
Firstly, I should say at this point - download the demo game, and use it as a reference if you get stuck. Play it through before you read this tutorial, so you get a feel for how AGS works. The demo game comes in source form, so you can check out how it was all done.
(NOTE: before we start, this tutorial was made using v2.5b of AGS. If you have a newer version, there may be minor inconsistencies in the screenshots where extra options have been added and so forth, but don't worry about it).
Now, you feel you're ready to go ahead and make a game of your own. So, start up the AGS Editor by double-clicking the AGSEDIT.EXE file, and you should be greeted by the following screen:
The "Welcome to AGS" dialog
Make sure that "Start a new game" is selected, and click OK. You will be presented with the Create New Game dialog box:
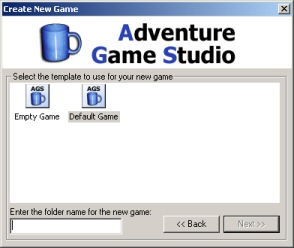
Create New Game dialog
Firstly,
you need to choose which template you are going to use for your new game. AGS comes with
two, and you can download
others from the internet.
The "Default Game" template is what we'll be using, and it comes with
some default graphics to get you started quickly. The "Empty Game"
template is something you may want to use later on when you're familiar
with AGS - it comes with no default graphics at all.
Then, you need to choose a folder name for your game. This is only used for the name of the folder that your game is created in, and the name of the final EXE file you compile. It is limited to 15 characters or less.
Click the Next button, and after a short wait you will be prompted to select a resolution for your game. For the purposes of this tutorial, we will use 320x200. Don't worry, you can change it later (via the "Set Game Resolution" option on the Game menu).
Now, you should be faced with the main AGS Editor window:
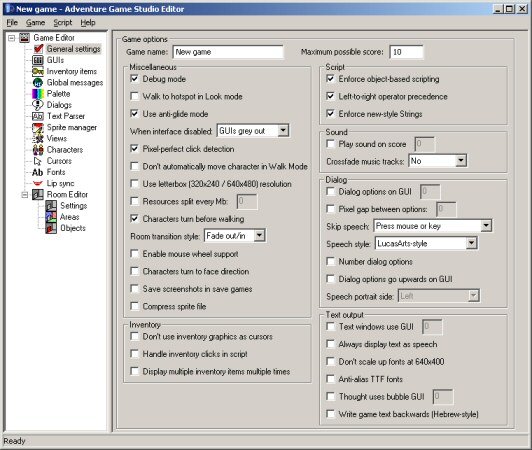
The main editor window
All these options and modes can look a bit intimidating at first, but don't worry - it's not as complex as it seems!
The first thing to do is to change that horrible "New game" in the title bar into something more catchy. For the purposes of this tutorial, I'm going to call it the incredibly lame "Roger's Adventure", but you can use whatever you like.
The name you type here is displayed in the taskbar while your game is running, and will also be the window caption if the player runs the game in Windowed mode.
Now, let's briefly examine the various options we have in front of us. Let's check these options to begin with:
Personally, I always check these four options when starting a new game. As you get a feel for AGS, you can decide what suits you best, and change these options again later.
Now, at this stage we really need to decide whether we want to create a palette-based (8-bit, 256-colour) game, or a hi-color (16- or 32-bit) game.
I'll cover both methods briefly below; if you're not really sure which to choose, go for Hi-color (16-bit) since it's much easier to handle.
(NOTE: We need to decide now because when you import graphics, they will be set to the game's colour depth. Should you change your mind later, you would have to re-import all the graphics).
Click on the "Palette" entry in the tree on the left. You should see this:
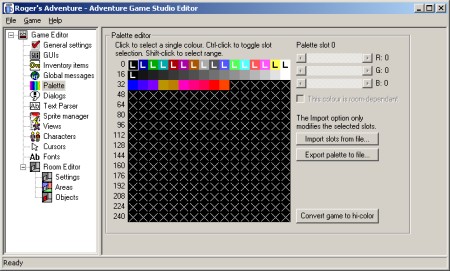
The Palette Editor
The palette display has a grid with the 256 colour slots on it. The first 17 are marked "L", which is short for Locked. These slots are fixed and you cannot change the colours of them. They are needed for various in-game displays such as the Save/Load dialogs, and so on.
There are then about 25 colours displayed with no "L". These are game-wide colours. That means that those palette slots have those colours throughout the game, in every single room.
Finally, the remaining colours, marked "X", are background colours and vary from room to room. This allows for different types of background to use different ranges of colours.
The default palette setup is a little badly weighted. Your GUI and main character graphics will have to use just the game-wide colours, since they are shown in more than one room. Therefore, unless you want a greyscale main character, the colours displayed are probably not enough.
So, let's swap some background colours for some game-wide ones. Select the first "X" slot, then hold shift and click on the last slot in the row marked "80". The screen should look as follows:
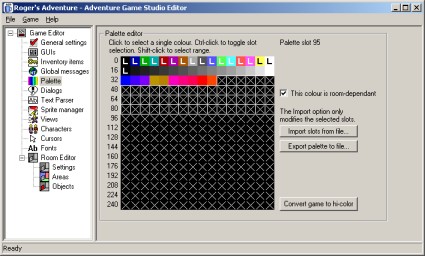
We have selected colours 42-95
Now, un-check the "This colour is room-dependant" box. All the selected "X"s turn into various colours.
If you select one of these colours, you'll see some R, G and B sliders appear on the right, where you can manually adjust the colour of that slot. You can either do this for every single colour, or you can set up slots 42-95 in another paint package, save a PCX file, and use the "Import slots from file" button.
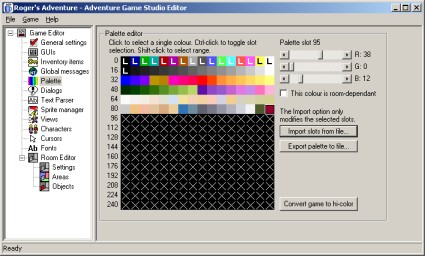
I've imported various colours
As you can see from the screenshot above, I've chosen to import various skin-type colours as well as various other ranges. What colours you use is up to you, and depends on what sort of colour scheme you're going for with your graphics.
(NOTE: You should set up the palette as well as you can now, because changing it later may require you to re-import some graphics).
Again, go to the Palette mode. Click the button in the bottom-right labelled "Convert game to hi-colour". A warning message will prompt you to make sure. Confirm it, and you're done.
Go to part 2:
Creating your first room
Tutorial created 26 August 2002; updated 11 Feb 2006. Copyright (c) 2001-2002 Chris Jones.