The room editor's main pane
Remember, adventure games are made up of several rooms, which the player moves between in order to play the game.
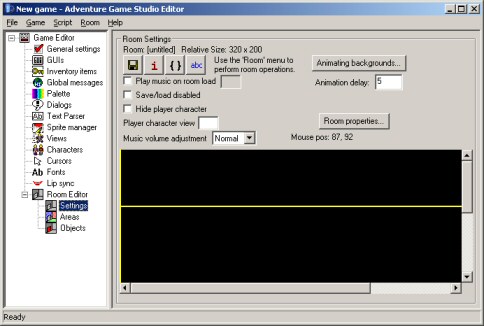
In the AGS editor, click on the "Settings" option under "Room Editor" in the left hand pane. You should see a screen similar to the following:
The room editor's main pane
As you have only just loaded the editor, the room here is empty.
The room editor is made up of three different modes - Settings, Areas and Objects.
The Background
Now, the first thing you need to do is draw the background for the room. Depending on what resolution you want to run the game at, you should draw it at either 320x200, 320x240, 640x400 or 640x480. Also, make sure your image is created at the colour depth that you chose earlier for the game.
Draw the image in your favourite paint package, and once done, save it as a BMP or PCX file. Then, return to the AGS Editor, and choose the "Import Background" option from the Room menu:
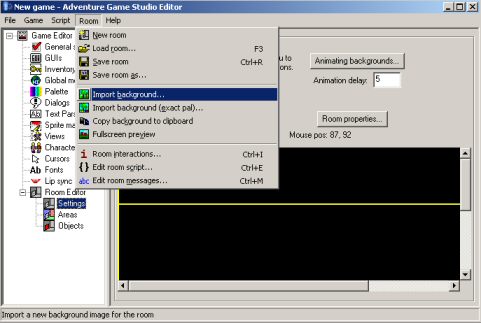
The "Import Background" option
Find the file you just created, and click Open. If you get a message asking which resolution the image is drawn for, select the appropriate option. (You are asked this because a 640x480 image, for example, could either be a full-screen image for a 640x480 game, or it could be a scrolling background for a 320x200 game).
You should see the black area in the bottom part of
the Editor replaced by your image.
|
|
The Room menu is a context-sensitive menu in the AGS Editor. This means that it will only be available when you are in one of the Room sections of the editor. If you select the GUI pane, for instance, you'll see that the Room menu is replaced by the GUI menu. |
Edges
You'll see four yellow lines drawn across your image in various places. These are the room edges, and they define how far the character needs to walk to be considered to have left the room. Click and drag them to position them appropriately. Bear in mind that it's the character's feet that are compared with these lines when positioning.

I've lined up the top and right edges correctly
At the moment, walking past the edge won't actually cause anything to happen, but we'll deal with that later.
Walkable Areas
Now, it's vital that we define the room's walkable areas. These define where characters are allowed to walk within the room. Choose the "Areas" mode from the left-hand tree, and then make sure that "Walkable areas" is selected in the combo box at the top of the pane:
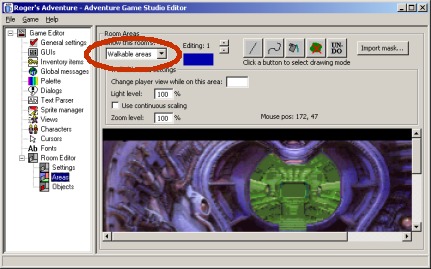
Make sure "Walkable areas" is the current selection
Now, you'll notice there are five buttons along the top of the window, allowing you to perform the tasks Line, Freehand, Fill, Wipe Colour and Undo, similar to a normal paint program.
What we need to do is to fill in the areas of the room where the player is allowed to walk. In the game, the bottom middle of the character is checked against these areas, so it's probably wise not to paint right up to the edge where you want them to go, since the character will appear to be further over.
The best way to start off is with the Line tool. Draw some lines to encompass the area that you want to be walkable. Make sure they are all joined up, and then choose the Fill tool and click in the middle of the area, and it should be filled blue. If the whole screen goes blue, click Undo, then use the Line tool to make sure all the edges of the area are connected up, and try again.
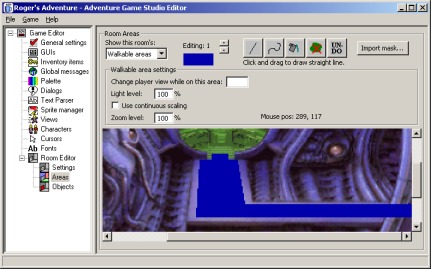
I've drawn a walkable area over the path in the image.
Walk-behind areas
The next job we need to do is to define the walk-behind areas. These areas (called "Priorities" by AGI and some other adventure game tools) tell the game where the character needs to be drawn behind the background. For example, in my example screen here, the player needs to walk in from behind the curved wall on the right.
Choose "Walk-behinds" from the combobox at the top of the screen. Your walkable area mask will disappear.
Now, we draw on the walk-behind area in the same way as we did the walkable area - in fact, all the same drawing tools are available. My result looks like this:
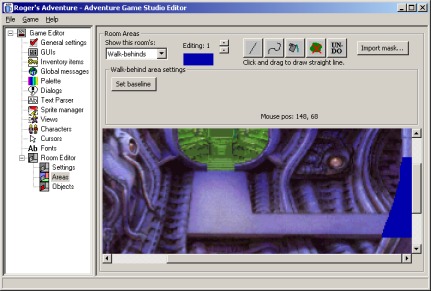
The walk-behind area painted over the pillar
Notice that I haven't bothered to make the whole of the pillar a walk-behind from top to bottom - using my knowledge of the walkable areas and the height of the character, I can just draw a walk-behind in the places where it's possible for the character to be.
Now that we've done that, there's a very important next step in order to make the area work - the baseline. The baseline is a horizontal line, which tells the game where the character has to be in order to be drawn behind the area. For example, if you had a table in the middle of the room, you'd only want him drawn behind the table if he was standing behind it.
You normally place a baseline at the lowest point of the walk-behind area. Click the "Set Baseline" button, then click at the bottom of your area, and a horizontal line will appear there.
You may have noticed at the top of the window a coloured block with "Editing: 1" written above it. By default, you've been drawing blue areas onto the screen. But what if we had two pillars, in different places? We wouldn't want the same baseline to apply to both. By changing the active colour, you can draw multiple areas onto the screen and let them each have their own baseline setting.
Trying out the game
Ok, we've slogged away at making our room - now it's about time to give it a go. The first, essential step is to save the room. Choose the "Room" menu, then "Save Room As...". In the file selector, type "room1" and press OK.
AGS uses numbered rooms, from 1 to 300. The filenames of these must be "roomX.crm", where X is the room number. Only rooms named this way will be recognised by the game engine.
Now, choose "Save Game" from the File menu - this saves all your valuable work to disk. Next, choose "Setup Game" from the File menu. Select the appropriate resolution for your game. Press the "Save" button.
Finally, it all comes together - select "Test Game" from the File menu. Your game should fire up and you should see your room with the character in it. Walk around the screen, testing out the walkable and walk-behind areas.
|
|
If the player is stuck and won't move, he probably didn't start on a walkable area. If this is the case, go to the "Characters" mode in the editor, and change the "Starts at X" and "Y" boxes. You can find out co-ordinates from the Room Settings pane (as you move the mouse, the co-ordinates are displayed above the background image). |
|
|
The normal way of exiting the game is to press Ctrl+Q. It's possible that during development of your game, you may create a script that causes the game to lock up - in this case, the emergency break key Alt+X will exit the game for you. |
Go to part 3: Adding interaction
Tutorial created 9 November 2002; updated 11 Feb 2006. Copyright (c) 2001-2002 Chris Jones.