Getting Started with AGS - Part 3
Adding some interaction
Ok, so we now have a working room. The player can walk around it as
much as they like. However, our game so far is pretty boring - the player
can't actually do anything of value yet!
AGS provides you with three types of things that the player can
interact with - hotspots, objects and characters:
- A hotspot is an area of the background image that the player
can look at, interact with, and so forth. Hotspots are generally used
for parts of the screen such as a tree or the grass, which won't
change as the game progresses.
- An object is an item in the room that can move around the
screen, and be switched on and off at will. Objects must stay within
the room that they are created in.
- A character is like an object, except that it can move
between rooms and therefore appear all over the game. Characters also
have special properties such as talking animations and so forth, which
means you will usually use one to represent each NPC (non-player
character) in the game.
Hotspots
The easiest thing to start off with is hotspots. Go to the
"Areas" pane under the Room Editor, and select
"Hotspots" from the drop-down list box.
Hotspots are drawn in exactly the same way as walk-behind and walkable
areas. This time though, the different colours that are available for
drawing with each represent a different hotspot. That is, if the player
clicks a dark blue area of the screen, then one response will be
triggered. If they click a green area, a different response will happen,
and so forth.
You can use the same colour in two different areas of the screen if
they represent the same object - for example, you could use colour 1 for
two different trees, as long as you want a common response for clicking on
both of them.
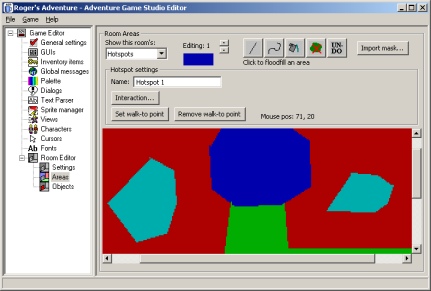
I've drawn four types of hotspot onto my screen
Notice the "Name: Hotspot 1". This allows you to give the
hotspot a name, which is vital if you are going to use a Lucasarts-style
interface where the player can move the mouse over the screen to see
what's where.
Interactions
Right, now it's time to make something happen! Make sure the first
hotspot is selected (it should read "Editing: 1"), and click the
"Interaction..." button. You should be presented with a window
that looks like this:
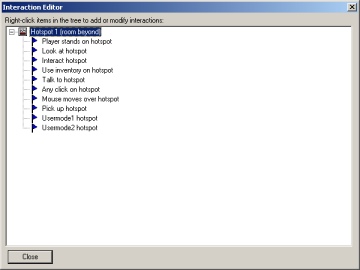
The interaction editor
This is the Interaction Editor, and you will become very familiar with
this window during your AGS development.
You should see a list of events, from "Player stands on
hotspot" at the top down to "Usermode2 hotspot" at the
bottom. The events are represented by flag icons.
These events show you all the possible things that can happen to this
hotspot during the game. At the moment, nothing is set to happen in
response to any of the events, so whatever the player does to the hotspot,
they will get no reply.
Right, let's start with something simple. When the player looks at my
hotspot, I want to display a message telling them what they can see. So,
double-click the "Look at hotspot" event, and a new window
should pop-up:
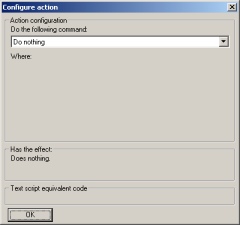
The action editor
You'll see that this new window is quite plain and empty at the moment.
The most important thing is the large drop-down list box near the top of
the window, which currently says "Do nothing". This box is where
you set what you want the game to do when the player looks at the hotspot.
Open up the combobox, and you'll see quite an extensive list of options
- but don't worry, they're in alphabetical order! Scroll down and select
"Game - Display a message". The rest of the window is updated
with information related to this command:

The action editor with "Display message" selected
The text "Message number: 0" is a parameter for the
command. Different commands have various parameters, and they let you set
specific information for this use of the command. Here, we are being asked
which message we want to display. Click the "Change" button if
you need to change it, but since this will be our first message, number 0
will be fine.
Messages
Each room in the game has its own set of messages. A message is simply
a string of text that can be displayed during the game. To bring up the
room message editor, there are two options - either click the "Edit
message" button in the action editor (like we have here), or at other
times you can use the "Edit messages" button in the Room
Settings pane.
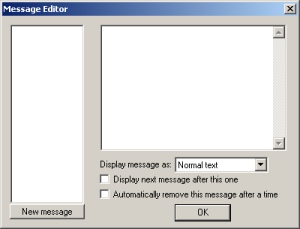
The room message editor
Click the "New message" button in the bottom left. A new item
should be added to the left hand list box, and the cursor is placed in the
text box on the right.
Simply type your message into the text box. The "Display message
as" box allows you to have one of the characters saying the text if
you want, otherwise leave it as "Normal text" to use the
standard message box.
Once you're done typing the message in, press OK.
You should be back at the Action Editor now. We've set it all up
correctly to display the message when the player looks at the hotspot, so
click OK to exit this dialog box. You should notice that a new tree node
"Game - Display a message (0)" has appeared in the main
interaction editor under Look at Hotspot. The (0) shows you at a glance
the values of the parameters to the command.
You can add as many commands as you like to be run when an event
happens. But now, since double-clicking collapses the tree, you need to
right-click on "Look at hotspot" and select "New
action" instead. However, let's not worry about that for now. Click
"Close" to exit the interaction editor.
Walk-to points
Ok, since we're back at the Areas screen, let me quickly explain the
"Set walk-to point" button. This allows you to set a position
for each hotspot where the character will walk to whenever the player
interacts with the hotspot - just like the way the Lucasarts games like
Monkey Island (tm) worked.
If you set a walk-to point, then whenever the player clicks interact or
talk on the hotspot, the main character will first walk to that point
before the relevant event is triggered. If you want, the man can also walk
there when the LOOK mode is used - this option is configurable in the game
General Settings pane.
To remove a walk-to point, select the appropriate hotspot and click the
"Remove walk-to point" button.
Edges revisited
Ok, so we've covered the basics of creating a room. However, there's
one thing that we did way back in the tutorial that we need to clear up -
yes, the edges.
Go to the "Settings" mode under the Room Editor. If you press
the Interactions button here, the Interaction Editor will appear, but this
time with a different set of events.
The "Interactions" button
Among the events listed, you'll see "Walk off left edge",
"Walk off right edge", and so on. These use the edges we defined
back in part 2. A common command to use in response to these events is the
"Player - Go to a different room" command.
Now, save the room and the game, then choose File, Test Game to test
out your room like we did before.
Go to part 4: Objects and inventory
Tutorial last updated 21 November 2002. Copyright (c) 2001-2002
Chris Jones.
|
